Hopscotch Play Guides

Dropdown
Reset filters
Thank you! Your submission has been received!
Oops! Something went wrong while submitting the form.

Magic Worry Jar

A magical game where kids meet Leona, the worry wizard, and use a worry jar (and a little bit of magic) to contain or make their worries disappear.

mwj_title_bg

About

Description: Magic Worry Jar is an engaging and therapeutic game designed to help children manage their worries and anxieties. In this game, kids visit Leona, the worry wizard, in her enchanting shop filled with an array of colorful jars. Each child selects a jar to serve as their personal worry container. They then write down their worries on virtual tickets and place them into their chosen jar. With a quick spell from Leona, the jar is sealed, symbolically containing their worries. Additionally, children have the option to use a magical worry wand to make their worries disappear completely, representing a symbolic release of their anxieties.

This game leverages the therapeutic intervention of worry jars, providing children with a creative and effective way to express and manage their concerns. It helps in developing coping mechanisms, enhancing emotional regulation, and reducing overall anxiety in a supportive and playful environment.

Ages: 4-8

Themes: Anxiety reduction, Emotional regulation, Self-awareness, Coping strategies, Mindfulness

Using Magic Worry Jar in Session

Begin by introducing the child to the concept of a worry jar. Explain that it’s a special place where they can safely store their worries, helping them feel lighter and more relaxed. Use simple, reassuring language to ensure the child feels comfortable with the idea.

Choosing a Jar
Allow the child to explore the various colorful jars in Leona’s shop. Encourage them to take their time and choose a jar that they feel a connection with. This choice helps personalize the experience, making it more meaningful for the child.

mwj_pick-a-jar
 
Writing Worries
Once the child has selected a jar, facilitate the process of identifying and writing down their worries. Use open-ended questions to help the child articulate their feelings. For example, ask, "Can you tell me about something that’s been on your mind?" or "What is something that has been making you feel uneasy?" Provide support and reassurance, emphasizing that all worries, big or small, are valid.

Once the worry is written, press the check mark to enter it into the jar.
 
mwj_add-a-worry
 
Sealing the Jar
The child can add up to 4 total worries in their jar.  At any time, they can tap on the cork to magically seal the jar.  Leona will assist with a spell that securely contains the worries inside the jar. This step is crucial as it symbolizes the containment of their worries, providing a sense of relief and control. Encourage the child to observe how it feels to see their worries safely sealed away.
 
mwj_seal-the-jar

Next Steps
At this point, once the worry jar is sealed, the child's worries are symbolically locked away.  There are a few options on how to proceed.
-With the jar sealed, the child can proceed with the rest of their day with no worries
-You can exit the game and revisit the worry jar the following session to see if the worries still remain for the child
-You can Download the magic worry jar using the button on the right tool bar. This downloads a PDF version that can be printed or sent electronically with the child.  The child will be able to revisit the worries at an agreed upon time later in the day or week.
-At any moment, the child can click into the ticket and can either edit their worry, delete, close out of it, or use the Worry Wand to make a specific worry disappear.


The Worry Wand
mwj_use worry wand
 
If the child chooses, they can use the worry wand to make their worries disappear entirely. Explain that this is a symbolic action, representing their ability to let go of worries that are no longer troubling them. This can be a powerful and empowering moment for the child, reinforcing their sense of agency over their feelings. Throughout the game, maintain an open dialogue with the child. Ask them how they’re feeling at each stage and provide gentle prompts to encourage deeper reflection. For instance, "How do you feel now that your worries are in the jar?" or "What does it feel like to make a worry disappear?" Use these discussions to validate the child’s emotions and provide support.
 
The child can proceed with clearing their worry jar until all the worries are gone! They can start over with a new jar or revisit Leona to choose a new one.
 

Related Resources

In the Hopscotch Play Print section, you will find a PDF titled My Magic worry Jar.  With this worksheet, the child has a take-home version of a magic worry jar that they can use whenever worries and anxieties appear.

 
 icon_pdf_my magic worry jar


Anxiety
Emotional Regulation
Coping skills

Using Hopscotch Play on Tablets

Explore tips for using Hopscotch Play on a tablet during telehealth sessions.
hp tablet banner

Tips for a Smooth Experience

Hopscotch Play now works on tablets! Whether you’re playing alongside a client in the office or connecting in a 2-Player session remotely, tablets give you more flexibility to bring fun and engaging activities to your sessions. Below are some helpful tips to make sure your experience is smooth and frustration-free.

1. Always Refresh Your Browser first

Whether you're in your office or using 2-Player, the very first thing to do when logging into Hopscotch Play is refresh your browser. This makes sure you're running the latest version of Hopscotch Play.  If in 2-Player, both provider and client should refresh their browser at least twice to make sure everything updates.

Refreshing on iPad (Safari)

safari refresh

Refreshing on Chrome (Android)

chrome refresh

2. Be Mindful When Minimizing Your Browser During 2-Player
When you're in a 2-Player session, minimizing your browser or switching between tabs will pause the session for both you and your client. If you're in a telehealth session, this can happen if you or your client clicks away from the Hopscotch Play window or tab to return to their video conferencing window or tab.Some video platforms, like Zoom, have a pop-out video window. This lets you keep your client visible while you stay inside the Hopscotch Play browser window.However, some browser-based platforms, like Simple Practice, don’t offer a pop-out option on tablets. If you (or your client) are using one of these platforms along with Hopscotch Play on a tablet, we recommend using split screen mode to keep from having to switch back and forth between browser tabs.


How to Use Split Screen on Your Tablet


hp split screen tablet


Split screen mode allows you to run Hopscotch Play and your video conferencing platform side-by-side in separate browsers, so you and your client can see each other while you play.  This is an ideal option for browser-based video platforms that do not offer a minimized video pop-out.  


Using Split Screen on iPad (Safari browser)

  1. Open Safari.
  2. Access your telehealth session in the browser.
  3. Tap the Multitasking button (three horizontal dots) at the top of the screen.

safari split screen


  1. Tap Split View.
  2. Tap the Safari icon in the Dock or on your Home Screen to open a side-by-side browser window.
  3. Access Hopscotch Play in the new window.

    Find more tips here.

Using Split Screen on Android (Chrome Browser)

  1. Open Chrome.
  2. Access your telehealth session in the browser.
  3. Tap the three vertical dots button to the right of the address bar.
  4. Tap New Window to open a side-by-side browser window.

chrome split screen


  1. Access Hopscotch Play in the new window.


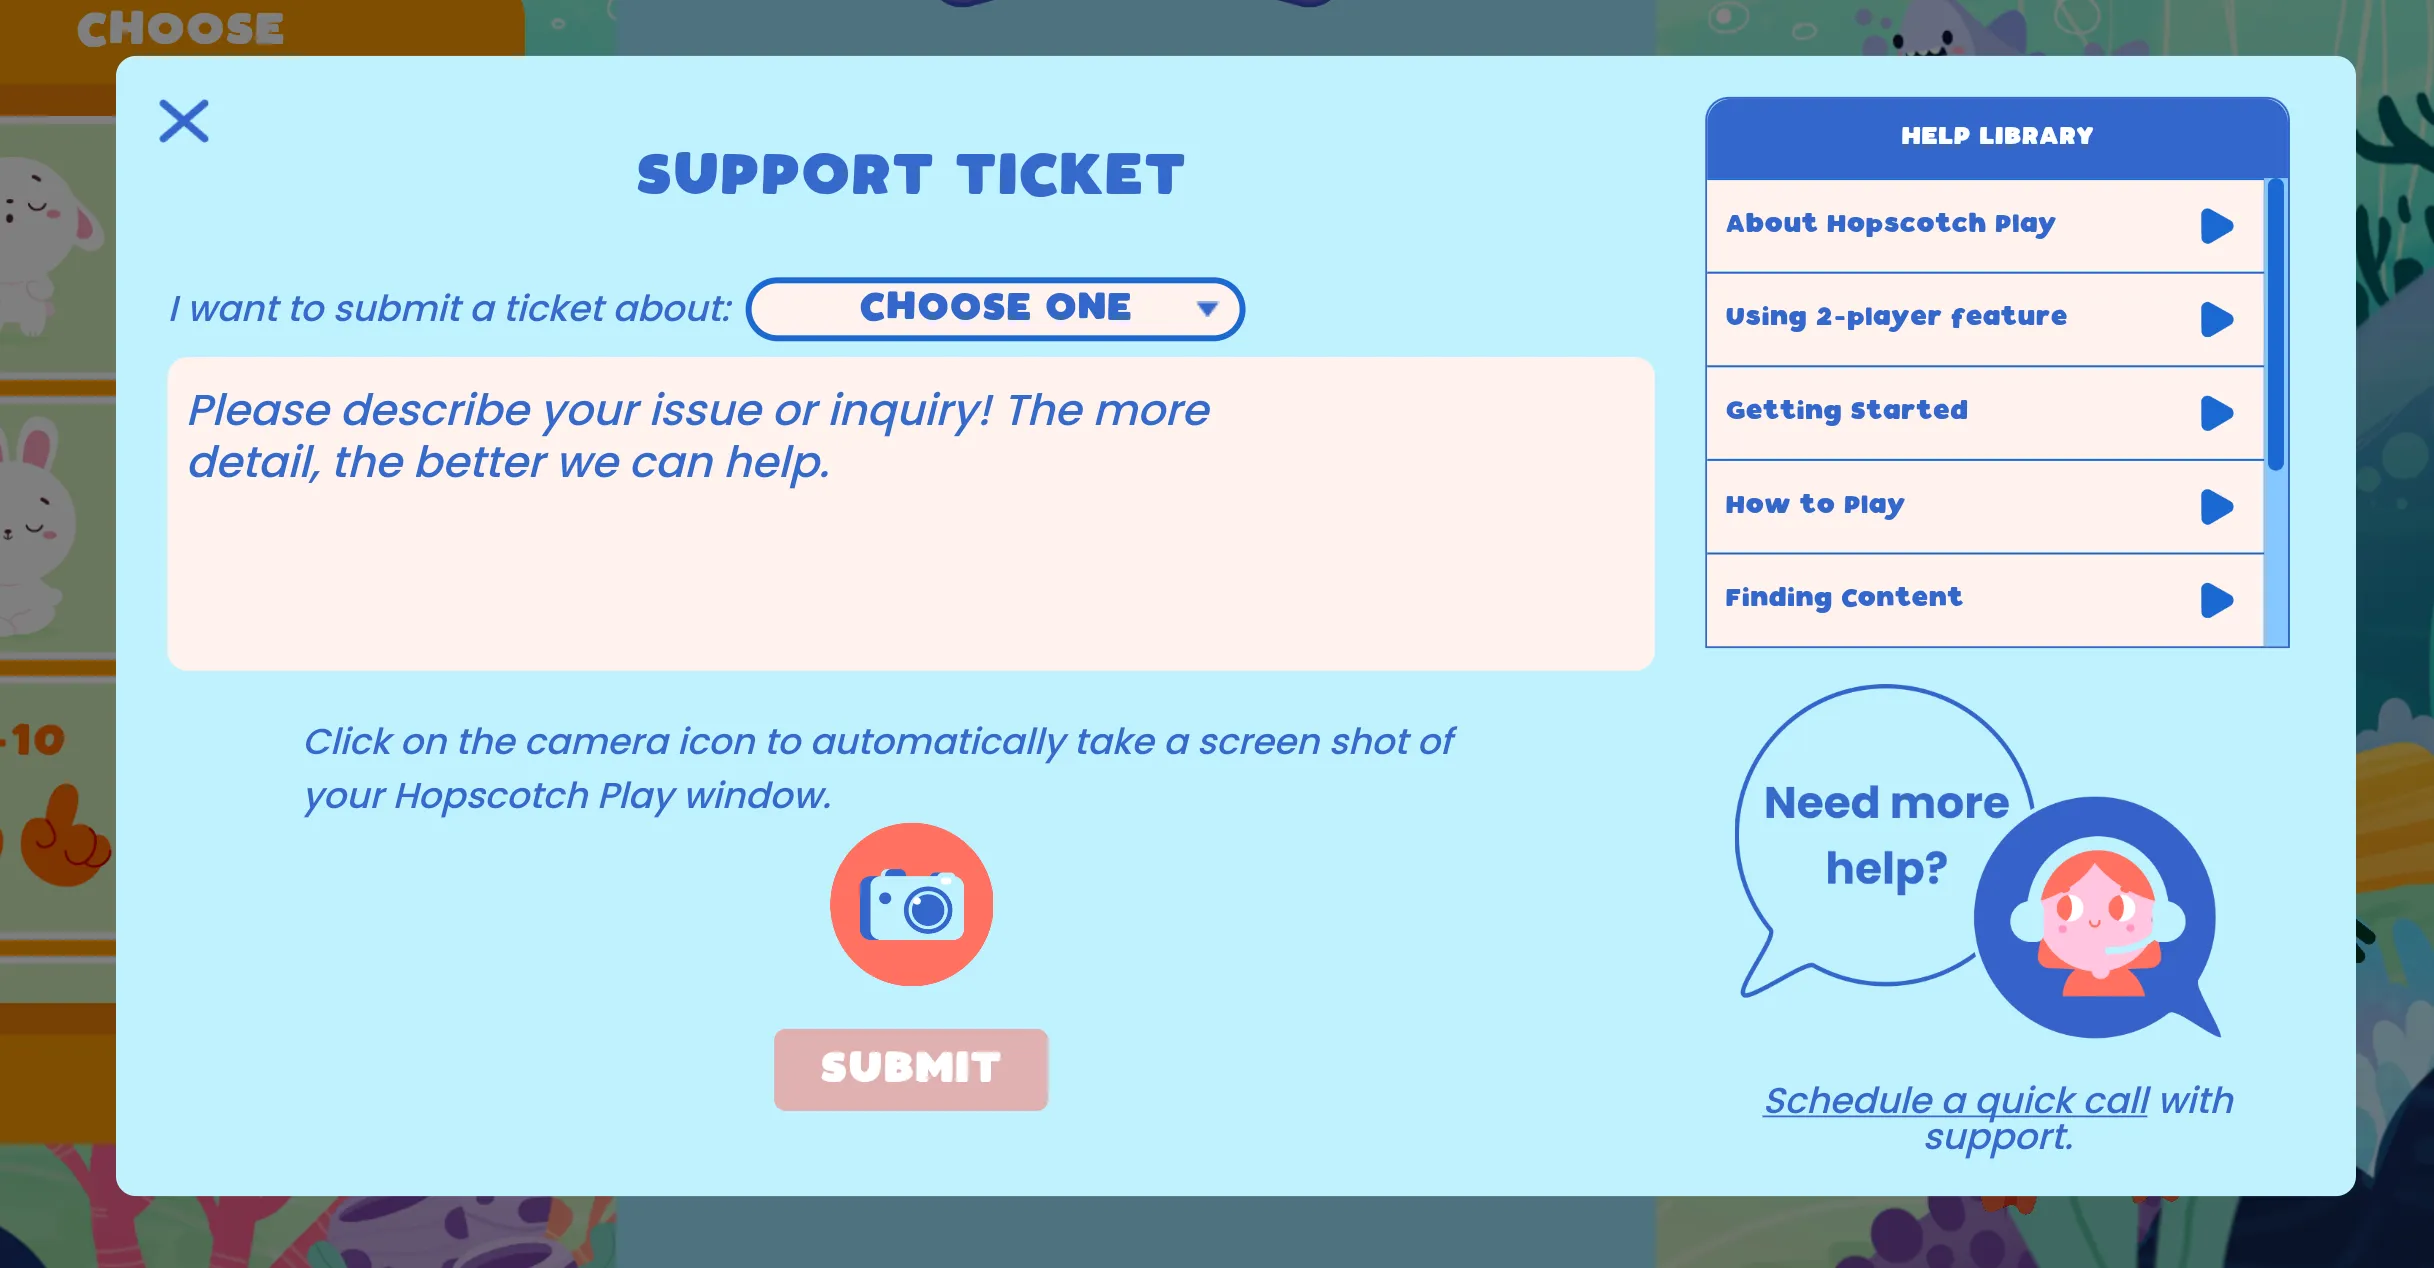
3. Experiencing Issues? We Can Help!

If you’re still running into problems, don’t worry! You can reach out to us easily:

  • Tap the Help icon in the bottom right corner of any screen on Hopscotch Play.
  • Submit a ticket letting us know what’s going on.
  • Screenshots are super helpful! By pressing the camera icon on the support ticket, you can take a picture of what you’re seeing and send it along with your message so we can troubleshoot faster.
Screenshot 2025-02-28 at 9.21.07 AM


Resource

New Client Area Coming Soon!

Explore tips for using Hopscotch Play on a tablet during telehealth sessions.
Screenshot 2025-05-08 at 9.44.17 AM

Introducing the New Client Area: Interactive and Engaging for Therapy Sessions

We’re excited to introduce a new, fun, and interactive section in Hopscotch Play, designed to help your clients engage more actively during their sessions. While the library is where you find all the content, this new area allows kids to interact with Hopscotch Play in ways that support their therapy journey, whether you’re working with them in-person or during a 2-player session. It’s a space where your clients can express themselves, track their progress, and engage in activities that support their emotional and mental well-being.  See what's coming!

Feelings Check-In

The feelings check-in lets kids express how they're feeling by selecting from a range of 20 different emojis. This simple yet meaningful tool helps clients identify and communicate their emotions in a visual and fun way, making it easier to start conversations about their emotional state.

Screenshot 2025-05-08 at 9.46.14 AM


Status Update

In this section, clients can edit and share what’s on their mind today. Whether it’s a thought, an event from the day, or just something they want to talk about, this feature provides a space for self-expression and reflection. It encourages clients to check in with themselves and helps you understand what might be affecting their mood or mindset during the session.

Screenshot 2025-05-08 at 9.47.31 AM


My Goals

Clients can create personal goals and track their progress in this section. It’s a great way to help them stay motivated and actively involved in their therapy process. Clients can type in their goals, check off completed tasks, and feel a sense of achievement as they make progress toward their personal milestones.

Screenshot 2025-05-08 at 9.53.56 AM


Edit Profile

In this section, kids can personalize their experience by editing the name of their client area, choosing from 20 NEW avatars, picking a buddy for the day, and changing the look and feel of their Hopscotch Play experience. With a variety of themes to choose from, clients can make their space feel unique and fun, creating a more personalized and comfortable environment to engage with during therapy.

Screenshot 2025-05-08 at 9.54.31 AM


Ready to Play?

This section is where you’ll find all the content you’ve pinned for the session. It’s easy to jump right into activities and games you’ve selected, and the “Jump Back In” tab allows you to quickly access recently played content. It’s all about making sessions flow smoothly and giving you quick access to the tools and activities you need.

Screenshot 2025-05-08 at 9.55.59 AM


Just for Fun

This area includes a variety of fun and therapeutic content that can help kids relax, laugh, and learn something new. From calming tips to jokes and interesting facts, there’s always something exciting to explore. These sections are regularly updated with new content, ensuring there’s always something fresh to keep your clients engaged.


Screenshot 2025-05-08 at 10.30.48 AM


- - - - - - - - - - - - -

With these new features, the client area in Hopscotch Play is designed to be both engaging and supportive, providing kids with the tools they need to connect with their feelings, track their progress, and have fun in the process. We’re excited to continue supporting therapists and clients in their journey, offering an environment that fosters growth, learning, and emotional well-being.


Resource

Climber

Climber is a game that helps clients break down big goals into smaller, manageable steps. Clients choose a theme for their climb and create a step-by-step path toward reaching their goal.

Welcome to Climber! This fun and interactive game is designed to help clients break down big goals into smaller, manageable steps. It's perfect for teaching kids how to set goals, build confidence, and it can even be used for exposure therapy with anxiety or OCD. To get started, click Start a new climb. Each goal your client wants to work on should be its own “climb.” On the next screen, the client will enter their big goal and then choose their preferred setting. They can pick from three themes: a city background, where they work their way to a rooftop, a mountain theme where they aim to reach the rainbow at the top of the peak, or a forest theme, where they climb towards a treehouse.

Once the goal and setting are chosen, it’s time to break the goal into smaller steps. Starting from the bottom, work with your client to input the first step. As they complete each step, they will move closer to their big goal. The number of steps is customizable, so you can add, delete, or rearrange them as needed until the climb is just right. After the climb is set, your client will begin their journey! Climber is designed to be used over multiple sessions, with clients returning to mark off completed steps and continue progressing. To mark a step as done, they simply click the goal and select Mark as Done, then reflect on how they felt about completing that task. Once they finish a task, the next step is highlighted in yellow, prompting them to continue their climb.

One of the best features of Climber is its ability to track multiple goals at once. Clients can work on several climbs simultaneously, and you can easily view their progress on the menu page. 

You can also make changes to your steps and goals at any time during the climb.  Open a step, and click Edit. This will take you to the edit screen where you can update text, re-order or re-do steps, or update your big goal.

Climber is a great way for kids to set and achieve goals in a fun and structured way, helping them build confidence as they break big challenges into small, manageable tasks.


Goal-Setting
Growth Mindset
Executive Functioning

Rowan's Sounds

Rowan's Sounds offers a variety of soundboards, each representing a unique environment containing multiple sounds.
title_rowans_sounds (1)

About

Description: Rowan's Sounds offers a variety of soundboards, each representing a unique environment containing multiple sounds. Clients can manipulate these sounds by adjusting volume, pitch, and tempo to enhance sensory exploration. Each soundboard contains multiple sounds, allowing children to immerse themselves in rich auditory landscapes. By exploring and interacting with these diverse sounds, Rowan's Sounds helps children develop their listening skills, improve focus, and foster creativity. This engaging and enjoyable game can be used to calm, stimulate, or simply entertain

Ages: 4-8

Themes: Sensory exploration, Expressive art, Imaginative play, Mindfulness, Self-awareness

Using Rowan's Sounds in Session

Explain the purpose of Rowan's Sounds to the child, emphasizing that it is a fun way to explore different sounds and environments.

Selecting a Soundboard
Allow the child to choose from the various soundboards available: beach, rainforest, space, or city. Encourage them to pick the one that interests them the most.

group_invite (1)


Exploring Sounds

Guide the child through the selected soundboard, encouraging them to explore the multiple sounds and features available.
rs_gameplay

 Sounds: The left-hand menu contains short theme-related sounds. The client can preview by clicking on the icon.Mixer: Each icon can be dragged and dropped into an empty circle on the mixer.  As the play line moves past, it will play that sound.  To remove an icon, click on the circle and press the "x" button that appears.  The same sound can be placed in multiple spaces.Pitch: The pitch of each icon can be adjusted by sliding the mixer up and down.

Tempo: Clients can adjust tempo by clicking on the tempo dial.  The higher the number, the quicker the loop plays.

Tracks: The tracks at the bottom are theme-related and can play in the background as the different icons are playing.  Multiple tracks can be played at the same time.Volume: Volume controls the overall sound of the soundboard. Play/Pause: This plays or pauses the loop.


Discussion Questions

1. Which environment soundboard (beach, rainforest, space, city) are you most excited to explore? Why?2. Have you ever been to a beach, rainforest, or city? What did it sound like?3. What kind of sounds do you find calming or relaxing?4. What sounds are you hearing right now? Can you describe them?5. Which sound do you like the most on this soundboard? Are there any sounds that you don't like?6. How does this particular sound make you feel? Calm, excited, curious?7. Can you imagine being in this environment? What do you see and feel besides the sounds?8. Which environment did you enjoy the most? What did you like about it?9. How do you feel now after exploring these sounds? Did any of the sounds change how you felt?10. How could you use sounds to help you when you feel angry, sad, worried, or happy?


Related Resources

In the Hopscotch Play Print section, you will find a PDF titled My Favorite Songs. This is a worksheet designed to help clients explore the different songs and sounds they use to help cope with feelings of anger, sadness, fear, and anxiety.


icon_pdf_MyFavoriteSongs (1)


Coping skills
Attention

Get Started with Hopscotch Play!

Getting started with Hopscotch Play!

Let's get you started with Hopscotch Play! This guide will help you learn how to add clients, explore content, and use it with your clients, while introducing you to all of our exciting features designed to enhance your sessions.

Scroll through or use the links below to jump straight to the information you need. 

----

[#about]About Hopscotch Play[#about]

Hopscotch Play is a web-based platform that provides therapeutic content for children between the ages of 5-18.  Our content is designed by child and adolescent behavioral health experts and is based in evidence-based interventions.

Hopscotch Play is designed to be a valuable tool for individual in-person and virtual sessions, offering a range of activities you can easily access on your computer and use with clients during therapy.

Hopscotch Play is designed to support a wide range of professionals and clients:

  • In-Person Therapists – A flexible, digital companion to the hands-on tools you already use.
  • Virtual Therapists – Our innovative Real-time 2-player mode makes online sessions interactive and effective.
  • Kids – Playful and interactive experiences that make therapy feel fun and safe.
  • Teens – Built to support engagement, rapport-building, and emotional growth.
  • Child-Focused Professionals – A powerful platform trusted by school counselors, social workers, teachers, and other professionals supporting children’s well-being.

Features available on Hopscotch Play:

  • Unlimited Client Accounts – Easily create and manage as many client profiles as you need without additional fees.
  • Ready to Use Resources – Access hundreds of pre-made activities, games, and printables designed specifically for child and teen therapy.
  • Custom Therapy Games and Tools – Use engaging digital tools that support emotional regulation, skill-building, and behavior tracking.
  • 2-Player Mode for Virtual Play – Play games in real-time with your client during telehealth sessions to boost interaction and connection.
  • Editable Printables with Custom PDF Editor – Personalize worksheets and handouts directly on the platform to tailor content for each client.
  • Audio Content – Stream calming guided meditations and relaxation music to support mindfulness and emotional regulation.
  • Interactive Sandtray Activity and Dollhouse – Encourage storytelling and emotional expression through open-ended, therapist-guided digital play.
  • Interactive SEL & Social Stories – Explore stories that teach essential social-emotional skills in an engaging way.

Quick Answers

Q: Can I try before subscribing?
A: Yes! We offer a 14-day free trial with full access so you can explore the platform and see how it fits your workflow.

Q: Do you offer a discount for a group plan?
A: Yes! We offer discounted group rates for clinics, schools, and organizations purchasing multiple seats. Just select Group under pricing options to view discounted rates for multiple seats. You can also toggle between monthly and annual plans to find the best fit for your team.

Q: Can I use Hopscotch Play for group therapy?
A: Hopscotch Play can be adapted for group therapy when working in person. Providers can use a single device to share resources with the group, rotating turns or guiding discussions using the activities. The 2-player feature currently supports just two people on separate devices. We're hoping to expand this functionality in the future.

Q: Can my client access Hopscotch Play outside of sessions?
A: At this time, Hopscotch Play is designed for use during provider-led sessions. The 2-Player link only works while the provider is actively logged into the client’s profile. Once the provider navigates away or logs out, the link becomes inactive. This means clients cannot access content independently outside of sessions just yet. The majority of our content includes features that allow you to download your progress as a PDF. This makes it easy to print out activities or share them electronically with caregivers, teachers, or other professionals.

[#specs]Optimal Device Specs for Using Hopscotch Play[#specs]

In This Section You’ll Learn: What devices, operating systems, and internet speeds offer the best experience and how to minimize any lag issues, glitches, or load times

Currently, Hopscotch Play is best experienced on a laptop, desktop, or tablet. Hopscotch Play does NOT currently support phones.  See below for recommended device specs for a smooth experience.

For the best experience with Hopscotch Play, we recommend:
- An internet speed of 100 Mbps or higher for smooth streaming and gameplay
- A laptop, desktop, or tablet (NOT supported on phones)
- At least 8GB of memory and a recent processor (like Intel i5 or AMD Ryzen 5)
- Windows or Mac operating system
- Using Chrome, Safari, or Edge browsers

If your device doesn’t meet these specifications, you may experience slower load times and some lag during gameplay.

Quick Answers

Q: Can I use Hopscotch Play on my phone?
A: Not at this time. Hopscotch Play currently only supports laptops, desktops, and tablets.

Q: What if my internet is slower than 100 Mbps?
A: The platform may still work, but you might experience lag or slower load times.

Q: What should I do if I'm experiencing technical issues?
A: Start by refreshing your browser. This resolves most issues, especially since the platform is updated frequently. If you're using 2-player mode, ask your client to refresh as well. If the issue continues, check that you're using a supported browser (Chrome, Safari, or Edge) and that your device meets the recommended specs. If problems persist, please do not hesitate to reach out to support.

 [#creatinghp]Creating a Hopscotch Play Account[#creatinghp]

  • To sign up and create a Hopscotch Play account, visit the onboarding page: https://play.joinhopscotch.com/onboarding
  • You can choose to sign up using Google SSO, Microsoft Entra ID (Azure Active Directory) SSO, or by creating a PIN. We recommend SSO for better security.

Signing Up Using Google SSO

  • Select Sign up with Google.
  • You will be taken to a screen to enter the email associated with your Google account. If you are already logged in, you will be given an option to choose the Google account you want to use to sign in.
  • When you click Next, you will be prompted to enter your password.
  • You will be taken to a permissions screen that allows Hopscotch Play to access your Name and profile picture and Email address for account creation. Select Continue to proceed.
  • After logging in using Google SSO, you will be taken to continue the sign up process on Hopscotch Play. Once you enter in your information, select Create Account.
  • On the next screen, you'll have a chance to review your order and make changes to your plan. Here you can change the number of seats you want to purchase, switch between annual and monthly billing, or enter a coupon code.  Ensure all of your information is correct before selecting Continue.
  • You will then be taken to a Stripe screen to complete your checkout and enter payment information. Please, review the details on this page to make sure everything is accurate before continuing.
  • After a successful transaction, you will be able to log into Hopscotch Play and land on your Provider Dashboard.

Signing Up Using Microsoft Entra ID (Azure Active Directory) SSO

  • Select Sign up with Microsoft.
  • You will then be taken to a screen to enter the email associated with your Microsoft account.
  • If you are already logged in, you will be given an option to choose the Microsoft account you want to use to sign in.
  • When you click Next, you may either be prompted to enter your password, have Microsoft send you a verification code, or log in using MFA.

Password

  • You will be taken to a permissions screen that allows Hopscotch Play to Sign you in and read your profile and Maintain access to data you have given it access to. Select Accept to proceed.
  • After logging in using Microsoft Entra ID (Azure Active Directory) SSO, you will be taken to continue the sign up process on Hopscotch Play. Once you enter in your information, select Create Account.
  • On the next screen, you'll have a chance to review your order and make changes to your plan. Here you can change the number of seats you want to purchase, switch between annual and monthly billing, or enter a coupon code.  Ensure all of your information is correct before selecting Continue.
  • You will then be taken to a Stripe screen to complete your checkout and enter payment information. Please, review the details on this page to make sure everything is accurate before continuing.
  • After a successful transaction, you will be able to log into Hopscotch Play and land on your Provider Dashboard.

Signing Up With a PIN

  • Enter your email address and select Create PIN
  • You will receive an email containing a 6-digit verification code. Enter the code and select Continue.
  • You will then be able to create a unique 4-digit PIN that you will use to log into your Hopscotch Play account.
  • After creating a PIN, you will be taken to continue the sign up process on Hopscotch Play. Once you enter in your information, select Create Account.
  • On the next screen, you'll have a chance to review your order and make changes to your plan. Here you can change the number of seats you want to purchase, switch between annual and monthly billing, or enter a coupon code.  Ensure all of your information is correct before selecting Continue.
  • You will then be taken to a Stripe screen to complete your checkout and enter payment information. Please, review the details on this page to make sure everything is accurate before continuing.
  • After a successful transaction, you will be able to log into Hopscotch Play and land on your Provider Dashboard.

[#dashboard]Provider Dashboard[#dashboard]

In This Section You’ll Learn: How to locate essential tools on your provider dashboard

Once you log in to your Hopscotch Play account, you'll land on your provider dashboard. This is your command center where you can:

[#settings]Account Settings[#settings]

In This Section You’ll Learn: How to manage your billing, group, and profile settings.

To access your account settings, click the gear icon in the top right corner of your Provider Dashboard. This will take you to the Manage Account area, where you can make changes to your account, billing, and group settings.

Once inside, you’ll see tabs on the left-hand side that allow you to manage different areas:

Billing

  • Upgrade your plan
    • If you are currently on the Lite or unpaid tier and you are wanting to upgrade your plan, go to Account Settings > Billing and Current Plan.
    • Select Upgrade to Paid Account. From there you will be prompted to select the number of seats you want to purchase and whether you want a Monthly or Annual Plan.
    • Billing will begin immediately after confirmation.
  • View billing history and download receipts/invoices
    • Go to Account Settings > Billing and select the View Billing History button.
    • From there you can view and download your invoices and receipts as PDFs.
  • Add more seats to your plan
    • If you would like to transition your paid individual account to a Group Plan, you can do so by adding more seats.
    • Go to Account Settings > Billing and under Current Plan, use the plus and minus buttons to change the number of seats included with your plan.  
    • Once your seats are selected, you will be provided with a summary of billing changes. Press 'Confirm' to accept the changes.
  • Update the card on file
    • Go to Account Settings > Billing and at the bottom, you will see your current credit card information.
    • Selecting the 'Edit' button will give you the option to add or make changes to your current card on file.

  • Cancel your subscription
    • Go to Account Settings > Billing.
    • Select 'Cancel Subscription' at the bottom of the page.
    • Follow the prompts to successfully cancel your paid subscription and remain on the Free plan (Lite Tier).

Manage Account

  • Reset your PIN
    • Go to Account Settings > Manage Account.
    • Under your email, you will see the option to 'Reset PIN'.
    • You will receive an email containing a 6-digit verification code. Enter this code on the next screen and select 'Enter'.
    • You can now enter in your new PIN.
    • Changes will take effect immediately.

  • Update your email
    • Go to Account Settings > Manage Account.
    • Under your email, you will see the option to 'Update Email'.
    • You will be prompted to enter your 4-digit PIN that you use to sign into Hopscotch Play. Once you do, click 'Continue'.
    • You will be prompted to enter in your new email address. Once you are done, click 'Send Code.
    • At your new email address, you will receive an email containing a 6-digit verification code. Enter this code on the next screen and select 'Update Email'.
    • Changes will take effect immediately.

  • Change your screen name
    • Go to the top of your dashboard and locate your provider avatar.
    • Click the small white pencil icon next to your avatar.
    • Your screen name will become an editable text box.
    • Type in your new screen name.
    • Click the check mark above “Save Changes” to save your new name.

  • Change your avatar
    • Go to the top of your dashboard and locate your provider avatar.
    • Click the small white pencil icon next to your avatar.
    • Arrows will appear beside your avatar.
    • Use the arrows to scroll through the available avatar options.
    • Click the check mark above “Save Changes” to save your new avatar.

  • Delete your account (note: this action is permanent and will delete all client data)
    • Go to Account Settings > Manage Account.
    • At the bottom, you will see a button that says 'Delete Account'.
    • Click on this button and go through the prompts to successfully delete your account.

Agreements

  • Go to Account Settings > Agreements.
  • Click on any icon to download a copy of the Terms and Conditions, BAA, or Privacy Policy

Manage Group

  • Add or remove group members
    • Go to Account Settings > Manage Group.
    • Click the button that says 'Add Members'.
    • You will be prompted to type or paste the emails of the members you would like to invite. Separate each with a comma.
    • Click the 'Invite Members' button when complete.
    • Invited members will receive an email inviting them to join your group.
    • As your members join, your Manage Group page will be populated with the members.

  • Change member roles
    • Go to Account Settings > Manage Group.
    • To the side of each member's name, you will see the Admin and User columns.
    • Checking and unchecking these boxes will change the member's role in the account.
    • To delete a group member, press the trash can icon located in the same name as their information.

Log Out

  • Sign out of your Hopscotch Play account

[#group]Managing Your Group Account[#group]

This section applies if you signed up as a group account or have changed your account type to a group account.

  • From your Provider Dashboard, go to Account settings (gear icon).
  • Select the Manage group tab.
  • Name your group.
  • As the person setting up the account, you are automatically the Admin. By default, you are also set as a user, which takes up one seat. Uncheck the "user" option if you will only be managing the group and not using the platform yourself.
  • Set up Group Security Settings (Optional, but recommended before adding members)
  • Click on Group Security Settings.


  • Follow the steps to configure your settings. You can require all invited users to use an SSO service that aligns with your account.
  • Input your domain name and select the SSO service.
  • Click Save to confirm your settings.
  • After you save, you'll be taken back to the Group management page. From here, click on Add Members. Here you can type or paste the email addresses of the members you wish to invite, separating each with a comma. When you're done, click Invite Members.
  • An email will be sent to the members, inviting them to join Hopscotch Play and create an account. They will be directed to the login page and must use SSO if you have enforced it.
  • Manage Invitations and Roles: You can track which members have accepted the invitation. Use the checkboxes in the list to change roles for specific users.

[#editing]Editing Your Profile[#editing]

In This Section You’ll Learn: How to update your provider avatar, display name, or PIN. Watch how to edit your profile or follow the steps list below.


After creating your Hopscotch Play account, you may want to update your avatar, name, PIN, or email.

You can change your avatar and name directly on your dashboard. Locate the Pencil icon next to your avatar at the top of the screen. Clicking this icon enables Edit Mode.

In Edit Mode, you'll see left and right arrows on either side of your avatar. Click these arrows to cycle through the available provider avatars until you find the one you want.

Below your avatar, there is a text field containing your name. Click into this field to update the text.

To save your changes, click the Save Changes checkmark. Your avatar and name will then be updated.

To change account information, click the account settings button in the top right corner. Then, select Manage Account in the left sidebar. From here, you will have options to Reset your PIN and Update your email.

Follow the verification steps for each option to complete the updates.

[#creating]Creating a Client Profile[#creating]

In This Section You’ll Learn: How to create a new client profile with a name, age group, and avatar. Watch how to create a client profile or follow the steps list below.


Welcome to Hopscotch Play! Let's get you set up and ready to go quickly.

Your first step is creating a client profile. This profile is your gateway to your client’s personalized dashboard and content library.To create one, start on your provider dashboard and click the blue plus button. This opens the Add Client popup.

First, enter a screen name. This is required and is the name that will actually display on your client's profile. They can change it at any time on their dashboard.  Right below that, you'll see optional fields for their first and last name. Next, select the client's age range. This helps determine some of the content your client will see on their dashboard.

Want your client to have access to Hopscotch Play at home? You can make that happen by checking the box to enable at home access. Just enter the caregiver's information and send them an invite email containing a link to create an account for their child. This feature is completely optional, and you can easily enable or disable it at any time.

After saving your client, you get the option to select an avatar. Clicking this takes you directly to their new profile and dashboard to choose an avatar. This can be done at a later time as well.When you close out, you’ll see your newly added client in your client list on your provider dashboard.  You can click into it anytime to hop back into their dashboard and content library.

Congratulations, you are ready for your first session on Hopscotch Play!

During your session, if you are meeting in person, simply pull up the platform on a device in your office to explore the games and activities side by side. If you are meeting virtually, open your client's profile and start a 2-player session using the widget in the top right corner.

Steps to creating a client profile

  1. On the Provider Dashboard, click the blue plus button.
  2. (Optional) Add full name (visible only to you).
  3. Enter a screen name (required).
  4. Select age range.
  5. Click "Save."
  6. Once saved, you can close the pop-up and you will see the new client's profile on your dashboard. Alternatively, when the pop-up is open, you can select "Edit Client Avatar", and you will be taken into your client's profile to their dashboard where you can select an avatar.

Quick Answers

Q: I created my account. Now what? How do I get started?
A: From your Provider Dashboard, your first step is to create a client profile. This sets up an individual account for your client and adds them to your dashboard. From there, simply click into their profile to open their personal library—this is where you'll explore and launch all Hopscotch Play content, including games, printables, stories, and interactive tools.

Q: Do I have to enter a full name?
A: No. Only a screen name is required. Full names are optional and only visible to you.

Q: What does the age range do?
A: The age range helps us understand who is using Hopscotch Play, allowing us to better tailor the content and features we develop. It ensures we’re creating age-appropriate tools that meet the needs of the clients you work with.


[#managing]Managing Client Profiles[#managing]

In This Section You’ll Learn: How to edit, reorder, or delete client profiles. Watch how to manage client profiles or follow the steps list below.


To edit your client list, click on Manage Clients. Here you can manage your Hopscotch Play caseload and make changes to individual client accounts.

You can click and drag on the reorder icon to change the order of how your clients appear on your dashboard. To sort clients in this list, you can click the drop down to either sort them manually, by most recently added, most recently opened, or alphabetically.

You can also click edit next to a client's name to make changes to their account. You can update your client's names, avatar, and age group. Right beneath that, you can click the checkbox to enable your client to log in from anywhere on their own device. This gives them easy access to their dashboard and tools outside of your scheduled sessions.

If you want to delete a client, you can do so from this screen or by clicking delete in the Manage Clients list. Be aware that this is permanent and any saved progress with this client will be lost.

Once you delete a client, their profile will be removed from your provider dashboard.

 Steps to managing client profiles

  • Click on "Manage Clients" from your provider dashboard. In the pop-up window, you'll see your full client list.
  • To reorder clients, click and drag the reorder icon next to a name.
    • Manual
    • Most recently added
    • Most recently opened
    • Alphabetical
  • To edit a client, click the "Edit" button next to their name. You can update their name, avatar, and age group. Right beneath that, you can check the box to enable your client to log in from anywhere on their own device.
  • To delete a client, click "Delete" from this screen or within the Manage Clients view.
  • ⚠️ Deleting a client is permanent and will erase all saved progress.

Quick Answers

Q: Can I recover a deleted client?A: No. Deleting a client is permanent and cannot be undone.

Q: Why would I reorder clients?A: Reordering clients allows you to prioritize which profiles appear first on your dashboard. This makes it easy to keep your most frequently seen clients at the top for quicker and more convenient access during sessions.

Q: Do I have to let my clients log in from anywhere?A: No, this feature is completely optional. You have full control to enable or disable it for individual clients at any time right from the Manage Clients screen.

Q: What happens when I enable a client to log in from anywhere?A: You will be prompted to enter a caregiver's email address to send them an invitation. Once they register the account, your client can access their personalized dashboard and tools on their own device between your sessions.

[#clientlogin]Setting Up Client Login[#clientlogin]

In This Section You’ll Learn: How to give your clients access to Hopscotch Play outside of your sessions. Watch how to set up client login or follow the steps list below.


Allowing clients to access their accounts outside of your sessions is a fantastic way to keep the momentum going. They can access tools, do check-ins, learn, read, and so much more.Keep in mind that this feature is completely optional, and you can easily enable or disable it whenever you need to.

To get this set up, head over to your provider dashboard and click on Manage Clients. This brings up your client list. Just choose a client to get started. Right below their age range selection, you'll see a checkbox to enable Hopscotch Play for your client to log in from anywhere.

Check that box, and a few input fields will appear. Enter the caregiver's first name, last name, and email address, then click Send Invite. This immediately sends an invitation directly to the caregiver.

Down below, you'll notice the acceptance status will show as pending. Once the caregiver receives the email, they'll be prompted to quickly register for an account.

After that account is created, your client can log in from their own device and dive into their personal dashboard. This is where they can update the look and feel, complete check-ins, and explore the newsfeed.

Most importantly, they have direct access to the specific content you pin for them. This means the coping skills toolbox you built together during a session is right there waiting when they're feeling sad or upset. Are they working on goals outside of session using our Climber game? They can log in and mark off progress the moment it's completed.  You can make any of our full library of content available to your clients just by using our pinning feature.

When your client is logged in, 2-Player also becomes simpler.  If you're in your client's profile on your device and they are logged into Hopscotch Play from their device, simply press Play on the 2-Player widget in the top right corner. You and your client will be connected instantly and seamlessly.

Giving your clients the ability to log in from anywhere opens up entirely new opportunities for how you use Hopscotch Play together.

 Steps to setting up client login

  • Click on "Manage clients" from your provider dashboard.
  • Choose a client from your client list.
  • Below the age range selection, check the box to enable Hopscotch Play for your client to log in from anywhere.
  • Enter the caregiver's first and last name, along with their email address.
  • Click "Send Invite" to email the registration link to the caregiver.
  • Note: The status will show as pending until the caregiver registers the account.

Quick Answers

Q: Is the client login feature required?

A: No. This feature is completely optional, and you can enable or disable it at any time.

Q: How does the client actually get access?

A: Once you click send, the caregiver receives an email prompting them to quickly register a Hopscotch Play account for the child.

Q: What can clients do when they log in from their own device?

A: They can update the look and feel of their dashboard, complete check-ins, and explore the newsfeed. Most importantly, they can access the specific content you pin for them

[#finding]Finding Content[#finding]

In This Section You’ll Learn: How to find the right content for your client by filtering by age, topic, title, or type. Watch how to find content or follow the steps list below.

Welcome to the Content Library! Let's explore how to find the right resource for your client. You can use our library filters to quickly narrow down your options. Use as many of the filters as you'd like to find what works best for your client. You can click on a category—like games, stories, or worksheets—to see what's available.  

You also have the ability to set the age range for your client. The age range recommendations are just a guide, so feel free to choose content based on your own clinical discretion. You can also search by specific themes to match exactly what you're working on with your client that day.

For example, if you’re working with a seven-year-old on anxiety, you might set the age range from six to nine and select Anxiety as your theme. The library will immediately show you tailored results. If you need to start over or adjust your filters, just click the X to clear them.

If you already have a specific activity in mind, you can always search for it directly by title.

Looking for bilingual resources? We offer worksheets with Spanish translations. Just click the English/Español toggle; when Español is selected, you’ll see the translated version of the worksheet.

You can also personalize your experience by uploading your own worksheets. Head over to your provider dashboard, click Upload PDF in the top right corner, and follow the steps to upload and categorize your file. Once finished, your resource will appear in the library under  Worksheets and My Uploads.

Our library is always growing, with new content added every week!

Steps to finding content

  1. Filter by content type (game, story, worksheet, etc.)
  2. Set minimum and maximum age
  3. Select theme (e.g., anxiety, self-esteem)
  4. Search by content title

Quick Answers

Q: How can I find content that fits my therapy approach?
A: You can use the Themes filter to find content aligned with popular therapeutic approaches, including CBT, DBT, Play Therapy, and Art Therapy. Just select your preferred approach to see relevant games, printables, and activities.

Q: Can I use content outside its age range?
A: Absolutely. Age ranges are guides. You are encouraged to use your clinical judgment.

Q: Can I request content that is not on the platform?
A: Yes! To request content or features, you can do so by clicking on the Request Content button. This button is found under the Themes section. Complete the form and it will be submitted to our content team!

[#spanish]Finding Spanish-Language Content[#spanish]

In This Section You’ll Learn: How to switch the library to show Spanish materials. Watch how to find spanish-language content or follow the steps list below.


To access these resources, start by clicking into your client’s profile, then head to the Library. At the side of the screen, you’ll see a language filter with a toggle between English and Español. By default, you'll see content in English. To switch to Spanish, simply click Español.


Once selected, the library will update to show only resources that have a Spanish version available. These are currently only text-based activities. Each one includes a title and description in Spanish, and you’ll notice a small “ES” icon to help you quickly identify them.  At this point, you can also continue to filter by age range or theme.
If you click More on any resource, you'll be able to view the full description in Spanish. Click Play from either the library or the description page, and you’ll be taken directly into the Spanish version of that resource.


You can use the tools to edit the Spanish resources as usual. Any edits will be saved specifically to the Spanish version of the activity. If you pin a Spanish resource, it will appear in Pinned Content in the library as well as on the Pinned section of the client dashboard.  This is the case even if your language setting is back in English.


 Steps to finding spanish-language content

  1. Enter client profile > go to Library.
  2. Use the language toggle to select "Español."
  3. Filter by age or theme if needed.
  4. Click "More" to read the full Spanish description.
  5. Click "Play" to launch the Spanish version.

Quick Answers

Q: Is all Hopscotch Play content available in Spanish?
A: Currently, only select text-based activities are available in Spanish.

Q: What other languages are available besides Spanish?
A: Currently, Spanish is the only additional language offered, as it’s been the most highly requested by our users. As demand grows, we’ll continue exploring translation options for other languages in the future.

[#exploring]Exploring and Playing Content[#exploring]

In This Section You’ll Learn: How to launch, preview, and review activities. Watch how to explore and play content or follow the steps list below.


Once you’ve found the right piece of content for your client, it’s easy to get started. Each content card includes a content type, title, short description, and a play button. To jump straight into the game or activity, simply press Play.If you’d like more details before starting, click More to open the content page. Here, you’ll find a longer description, therapeutic themes and tags, and the recommended age range. You’ll also see related resources that can supplement the activity. From this page, you can start the game anytime by clicking Play.


Steps to exploring and playing content

  1. Click "Play" to launch an activity
  2. Click "More" to view full description, themes, tags, and related content
  3. Use "Info for Providers" during the activity for guided use

Quick Answers

Q: Can I see more details about a game before playing?
A: Yes. Click "More" on any content card to view a full description, tags, and age recommendations.

Q: What type of content is available on Hopscotch Play?
A: Hopscotch Play offers a wide range of interactive tools designed for child and teen therapy. This includes custom games, printable worksheets, guided meditations, digital stories, psycho-educational slideshows, audio tools, and open-ended activities like the interactive sandtray and dollhouse. All content is filterable by age and theme to help you find exactly what you need for each session.

[#pinning]Pinning Content[#pinning]

In This Section You’ll Learn: How to save and organize content for each client. Watch how to pin content or follow the steps list below.


Pinning is a great way to stay organized and make session planning even easier. Every resource in the library can be pinned so you can access it quickly later. To pin an item, just look for the pin icon on any content card and click it. The icon will change to let you know it’s successfully pinned.

To see everything you’ve pinned for a specific client, just click View Pinned Content, and the full list will appear. You can also find these resources on your client dashboard making it easy to access content during sessions.  Once at the dashboard, scroll down to the Pinned for this Session section. This is your go-to spot for everything you've selected so far, and it’s also where you can unpin items if you no longer need them.

When clients log in from home, they’ll only see the specific resources you’ve pinned for them. This makes pinning a perfect way to assign homework and keep the therapeutic work going between sessions.

Steps to pinning content

  1. Click the pin icon from the library or activity page.
  2. Visit "View Pinned Content" on the client profile to access saved items.
  3. Pinned items are also available on your client's dashboard in the Pinned for this Session section.

Quick Answers

Q: Can I unpin something later?
A: Yes. Click the pin icon again to remove it from your client’s profile.

Q: How can I assign homework for a client?
A: Pinning is a great way to assign homework for your clients. Since they'll have access to their dashboard from their own device, any content that you pin will be accessible in the Pinned for this Session section.

[#uploader]Using the PDF Uploader[#uploader]

In This Section You’ll Learn: How to upload your own PDF resources into Hopscotch Play using the PDF Uploader. Watch to learn about how to tag and organize them, and access them during sessions with clients.


Hopscotch Play has a feature that allows you to bring your own resources into the platform—so you can expand the content you use with clients, grow your personal library, and put to use all the effective tools you’ve collected over the years. Best of all, it keeps everything in one place alongside Hopscotch Play’s interactive tools.

To get started, go to your provider dashboard and look to the top left of the screen for the My Uploads icon. Click to enter your Uploads page, then click the “Upload a PDF” button to begin. You’ll see a quick outline of the steps to get your PDF onto the platform. 

First, you can drag and drop your file or click to upload it from your device. Once your file is uploaded, you’ll see a preview of it on the right.

Next, name your resource. The file name will be auto-filled, but you can change it to something more descriptive if you’d like. This name will be searchable in your filters in the library. You can also add an optional short description of the resource, which will also appear on the content card in your library. Then, choose from existing tags in our system. Tagging makes your PDF appear when you filter or search by tag in the library. You can also select the language—either English or Spanish. If Spanish is selected, the content will only appear when the Spanish toggle is on in the library.

When you’re ready, click Save. Your PDF will be successfully uploaded, and you’ll see it listed in your Uploads screen. From here, you can search your uploads by title, edit the resource by clicking on the card, update the name, description, tags, or language, or delete the resource if needed.

Once uploaded, your PDFs are ready to use with clients. Go to a client’s profile, click the Worksheets button, then open the dropdown and select My Uploads. Your library of uploaded PDFs will appear here. Clicking Play will open the PDF in our Interactive PDF Editor, where you and your client can work together using drawing tools, text, stickers, and more. Your PDFs will also appear in the library when using filter functions, including searching by title or theme.

With PDF uploads, you can integrate your favorite resources seamlessly into Hopscotch Play!

Quick Answers

Q: How do I upload my own PDF?
Click the My Uploads icon in the top-left of your dashboard, then hit Upload a PDF. You’ll follow simple steps to drag and drop your file, give it a name, and choose tags.

Q: Can I edit my uploaded PDF later?
Yes! Go to the My Uploads screen, click the resource card, and you’ll be able to update the title, description, tags, or delete it.

Q: Where do I find my uploaded PDFs during a session?
Go to your client’s profile, click Worksheets, and then choose My Uploads from the dropdown to access your uploaded files.

Q: What tags should I use?
Choose tags that help you filter and find your resource later—such as “anger,” “mindfulness,” or “executive functioning.” You can only use tags already in the system.

Q: Can clients access uploaded PDFs on their own?
No, PDFs must be launched by the provider during a session. Clients won’t see your uploads outside of the session.


[#gameplay]Gameplay Features and Tools[#gameplay]

In This Section You’ll Learn: What tools are available during gameplay. Watch to learn about gameplay features and tools or follow the steps list below.


When you’re playing a game or running an activity, you’ll notice several helpful features designed to keep your sessions moving smoothly. In the top right of your screen, you’ll find the 2-Player widget. Just click to expand it and hit play to begin the synced session with your client. If you ever run into a snag, the support chatbot is located in the bottom right corner—simply expand it to share any questions or technical needs you have.

For general navigation, look to the bottom left for the in-game menu gear icon. This is where you can view specific game settings or select Exit Game to head back to the content library or your client dashboard. Keep in mind that certain settings on this screen may be enabled or disabled depending on the specific features of the game you're playing. Most activities also feature a How to Play button, which opens a pop-up with a video and text walkthrough to guide you through the activity.

You also have a few handy tools for managing the gameplay itself. The Clear Game button is perfect for resetting an activity, which is especially useful for our drawing games. If you want to save a moment from the session, the download button will take a screenshot and generate a PDF for you to keep. You can even manage the soundscape with separate audio controls: one for background music and sound effects, and another for the game’s voiceover. Both can be muted or unmuted with a single click.

You’ll also have exclusive access to Provider Tools. This area is hidden from your client during 2-Player and is packed with clinical support. You can click About to review the game’s objectives or pull up Discussion Questions to find prompts that help drive the conversation while you play. If you want to expand on a topic, the Related Resources tab will show you similar content that you can check out or play instantly. You can even access your pinned content right from here to keep your favorite tools within reach.

These features are all built to handle the technical details so you can stay focused on what matters most: the connection with your client.

Available features and tools

  1. About: A quick overview of the game’s clinical objectives.
  2. Discussion Questions: Helpful prompts to drive the conversation during the activity.
  3. Related Resources: Similar content you can use to supplement the current session.
  4. Pinned Content: Quick access to your favorite saved resources.

Quick Answers

Q: Can clients see the Provider Tools?A: No. The Provider Tools section (including the About tab, Discussion Questions, and Related Resources) is only visible on your screen. It is completely hidden from your client’s view during 2-Player mode to ensure your clinical prompts and notes remain private.

Q: How do I reset a drawing or a game?A: Simply click the Clear Game button. This will instantly reset the activity, which is especially useful for starting over on drawing boards or interactive worksheets.

[#clientdash]Client Dashboard[#clientdash]

In This Section You’ll Learn: What features are available on the client dashboard. Watch to learn about the features and tools or follow the steps list below.

This is a dedicated space designed to make your sessions more engaging, whether you are meeting face to face or using our two player feature.

We know a client's age and personality changes by the hour, from a playful and animated seven year old to a serious and thoughtful sixteen year old, and everything in between. That is why we have built this dashboard to be fully customizable. Your younger clients can make it playful and bright, while your teen clients can keep it sleek and modern, or whatever best fits their style.

------

Let’s start by looking at how clients can make this space their own. When you click into a client's profile from your provider dashboard, you will be taken straight to their dashboard.

In the All About section, clients can choose a screen name and select an avatar. They can pick from our illustrated human characters, choose one of our Psykick buddies, or upload their own image that represents them best, such as a picture of themselves or something they find interesting. They can also update the entire look of the dashboard here. They can choose from rows of light or dark colors, select one of our custom patterns, or upload their own background image for total personalization.

Right underneath their avatar, clients can update their status to share what is on their mind right now.

In the Playlist area, clients can share the music and videos that matter to them. They can grab a link from YouTube and drop it right here. The song or video will appear in their playlist, ready to watch or listen to directly within Hopscotch Play. This is a great way to explore songs that matter to them in the moment, share cool videos with you, and explore other interests.

Let’s visit the Check in area next. This is a perfect way to start a session. It offers a complete range of ways to check in. Clients can identify their feelings using colors or emojis and select topics that are on their mind. They can also share their highs and lows from the week and rate different areas of well being, like appetite, exercise, and stress levels. This is a great guide for setting the session agenda and will give you lots to explore with your client.

In the My Circle section, clients can identify the top five people in their support system. They can add names, choose avatars, or upload photos to represent them. Below that is the Goals section. Here, you can work together to create and track goals, using the progress slider to measure success week over week.

To keep things engaging, we have added a fun section at the bottom. This includes a Mini Mission which is a small actionable task for the week, and a weekly Poll and Trivia question.

When you are ready to get to work, check the Pinned section to access activities you have saved from the library, or click Recently Played to jump back into a favorite game.

Last but not least is My Feed. Designed to feel like a social media feed, this area highlights mental health tips, fun facts, current events, and more. There are two versions of this feed. One for kids and one for teens. You have full control over this. Simply visit your Provider Dashboard to update the client’s profile. If you select Teen, their dashboard will automatically update to show the teen focused newsfeed.

The dashboard is designed for all ages. It is a powerful way to personalize your practice and keep kids and teens actively involved in their own journey.

Quick Answers

Q: Can clients customize their dashboard?
A: Yes. Clients can choose a screen name, select or upload an avatar, pick background colors or patterns, upload a background image, and personalize the overall look of their dashboard.

Q: How can a client share how they’re feeling at the start of a session?
A: Clients can use the Check-In area to identify feelings with colors or emojis, select topics on their mind, share highs and lows, and rate areas like stress, appetite, and exercise.

Q: Can clients share music or videos they like?
A: Yes. In the Playlist section, clients can paste YouTube links to songs or videos, which will appear in their playlist and can be played directly inside Hopscotch Play.

Q: Where can I find activities I’ve saved for a client?
A: Go to the Pinned section on the client’s dashboard to access saved activities, or use Recently Played to jump back into games you’ve used before.

Q: How do I switch a client to the teen version of the dashboard?
A: From your Provider Dashboard, edit the client’s profile and select the Teen option. Their dashboard will automatically update to show the teen-focused newsfeed.

[#two-player]Using 2-Player[#two-player]

In This Section You’ll Learn: How to share a live session link with a client. Watch to learn about using 2-Player or follow the steps list below.

2-Player is a great feature that lets you and your client play games together in real time, even if you’re on separate devices, like a computer or a tablet. Hopscotch Play does not currently support phones.  You'll find the 2-Player widget throughout your client's profile, making it easy to start a connection from almost anywhere, like the content library, their dashboard, or even inside a game.

To get started, go to your client’s profile and look for the 2-Player widget in the top right of your screen. When you click the Play button on the widget, you’ll see a Ready to Play pop-up reminding you to stay on your current Hopscotch Play tab to keep from breaking the 2-Player connection. Click “Will do” to continue.

Next, you’ll see instructions for the two ways to connect with your client through 2-Player. The recommended way is if your client is currently logged into their Hopscotch Play account on their device. The client login feature would need to be set up in advance. If you didn’t enable it during creation of your client profile, don’t worry! You can always activate this feature by going to Manage Clients on your Provider Dashboard, choosing a client, and clicking the checkbox to enable at home access.  Send the caregiver an invite email, and once they register, your client will be able to log into Hopscotch Play from their device at anytime.

When you click the play button on your 2-Player widget, if your client is logged into their dashboard, all you need to do is to ask them to click the Play button in the 2-Player widget on their end.

The other way to start 2-Player with your client is by sharing a link.  On the right side of the 2-Player pop-up, you’ll see a button that says “Copy Link”. Clicking this button will  save it to your clipboard.

Now you can share this link with your client. We suggest pasting the link in the chat feature of your telehealth platform. Hopscotch Play doesn’t include built-in video, so you’ll need to use the video feature from your telehealth platform alongside it.

Once your client clicks the link on their device, they will join you in 2-Player.  When they join, the red dot on the 2-Player widget will turn green, and you’ll hear a notification letting you know they are online, and from that moment on, all your interactions—like scrolling, drawing, typing, or moving objects—will be perfectly synced for both of you.

The 2-Player feature connection relies on both you and your client staying on the Hopscotch Play tab. Every time either of you navigates away or minimizes your Hopscotch Play window, the connection can break. When you return, it may take you a few seconds to reload and reconnect. We strongly recommend keeping the Hopscotch Play window active.

You can use Picture in Picture in your telehealth platform so that your video session with your client appears in a small box while Hopscotch Play is active.  Most browsers are now providing an option to split screen right within the same tab.  You can also keep two windows open side-by-side, or if you have an external monitor, you can keep the Hopscotch Play window open in one and your video session in another.

Sometimes, you may receive a prompt asking you to refresh your browser.  This is done whenever there is a new update, and the refresh ensures that you and your client are using the same version.  Typically, if you run into any issues with 2-Player, a quick refresh should get things back on track.  Other issues could be related to network speed and connection, or if either of you are joining from an unapproved device. You want to make sure that both you and your client have a stable internet connection and are joining from either a tablet or laptop.  We also recommend using a Chrome browser if possible to minimize any potential issues.

You should also know that some features are only visible to you and not to your client.  This includes the filters in the content library, the Related Tools window, and certain toolbar options.

Remember that leaving your client's profile at any time will end the session, and you'll need to generate a new link for your client to reconnect; however, the original link remains active as long as you stay within the profile, even if your client momentarily disconnects.

If you want to end the session manually, just click the "End 2-Player" button, which will remove your client from the session.

With these steps, you and your client can start collaborating in real time and make the most of Hopscotch Play’s 2-Player feature.

Steps to using 2-Player

  • Click the Play button on the 2-Player widget. It is located at the top right of your client's profile.
  • Click "Will do" on the "Ready to Play" pop-up to acknowledge the reminder to keep your Hopscotch Play tab active.
  • Connect with your client using one of two methods:
    • Method 1 (Recommended): If your client is already logged into their Hopscotch Play account on their device, simply ask them to click the Play button on their 2-Player widget to connect.
    • Method 2: Click "Copy Link" on the pop-up and share it with your client through the chat feature on your telehealth platform.
  • Wait for the client to join. The red dot on your 2-Player widget will turn green, and you will hear a notification letting you know they are online.
  • Your screens will now sync and mirror each other.

Quick Answers

Q: How does my client log in?

A: The recommended way to connect is to have your client log into their Hopscotch Play account on a computer or tablet. If they are logged in, they simply click the Play button on their end to join. Alternatively, they can join without logging in by clicking the 2-Player link you share with them. Note: Hopscotch Play does not currently support phones.

Q: How do I get my client to join?

A: To have your client join you, click the Play button on the 2-Player widget, click "Will do" on the pop-up, and either ask your logged-in client to click Play on their device, or click "Copy Link" to share the connection link with them via chat.

Q: What if my client disconnects?

A: Navigating away from or minimizing the Hopscotch Play tab can break the connection. If they disconnect, they can rejoin using the same link (or by clicking Play again) as long as you haven't left the profile. If you leave the profile, the session ends and you will need to generate a new link.

Q: How do I add my client to a game?

A: 2-Player can begin whether you are in the Library, the client dashboard, or already inside a game. As long as you see the 2-Player widget in the top-right of your screen, you can begin the connection. Press the Play button, click "Will do", and connect via their login or the shared link.

Q: How can I see my client during 2-player mode?

A: Hopscotch Play doesn’t include built-in video, so you’ll need to use the video feature from your telehealth platform. To keep your Hopscotch Play tab active and avoid breaking the connection, we strongly recommend using Picture-in-Picture, your browser's split-screen tool, side-by-side windows, or an external monitor.

Important Notes for 2-Player:

-Exiting your client’s profile at any time will end the session. If you leave, you will need to generate a new link for your client to reconnect. However, as long as you remain in the profile, the same link will stay active—even if your client disconnects.

-To manually end a 2-Player session, click the “End 2-Player” button. This will remove your client from the session.

[#2playtele]Using 2-Player with Your Telehealth Platform[#2playtele]

The 2-Player feature in Hopscotch Play lets you and your client play together in real time. However, Hopscotch Play doesn’t include built-in video, so you’ll need to use the video feature from your telehealth platform alongside it.

Here are tips for using Hopscotch Play's 2-Player feature on the most popular telehealth platforms:

Zoom

If you're using Zoom:

  • If you're using Zoom chat to send the 2-Player link, send it first, then minimize the Zoom using the yellow dot on Mac (in the top-left corner, between the red and green buttons) or the small horizontal dash on Windows (in the top-right corner). Minimizing your window will keep the Zoom video feed visible on top of Hopscotch Play.
  • Once your Zoom window is minimized and is on top of your Hopscotch Play window, let your client know that they can now click on the 2-Player link. You want to make sure you are on the Hopscotch Play screen when they do.
  • This setup helps keep the Hopscotch Play window active and ensures a strong 2-Player connection.

Google Meet

For Google Meet, use Picture-in-Picture (PiP):

  • PiP allows you to see your client in a small floating window while staying in the Hopscotch Play tab. Some Google accounts turn this on automatically when switching tabs.
  • If yours does not, look for the PiP icon by hovering your mouse over your client's video during a call. It appears as a square with a smaller square inside it, often accompanied by an arrow. Note: This option will only appear if your camera is enabled.
  • Send the 2-Player link in the chat, then activate PiP and switch back to Hopscotch Play.
  • Your client’s video should now stay visible as a small overlay while you are in the Hopscotch Play tab. Let your client know that they can now click on the 2-Player link. You want to make sure you are on the Hopscotch Play screen when they do.

SimplePractice

For SimplePractice, use Picture-in-Picture (PiP):

  • PiP allows you to see your client in a small floating window while staying in the Hopscotch Play tab. For SimplePractice, Picture in Picture isn't available when doing telehealth on a tablet or mobile device.
  • You can access PiP by right clicking on your client's image. Find and select Picture in Picture. Note: This option will only appear if your camera is enabled.
  • Send the 2-Player link in the chat, then activate PiP and switch back to Hopscotch Play.
  • Your client’s video should now stay visible as a small overlay while you are in the Hopscotch Play tab. Let your client know that they can now click on the 2-Player link. You want to make sure you are on the Hopscotch Play screen when they do.
  • To learn more, visit SimplePractice's Telehealth Help Page.

doxy.me

For doxy.me, use Picture-in-Picture (PiP):

  • PiP allows you to see your client in a small floating window while staying in the Hopscotch Play tab.
  • When in a session, picture-in-picture will be located in the lower right corner of your screen.
  • Send the 2-Player link in the chat, then activate PiP and switch back to Hopscotch Play.
  • Your client’s video should now stay visible as a small overlay while you are in the Hopscotch Play tab. Let your client know that they can now click on the 2-Player link. You want to make sure you are on the Hopscotch Play screen when they do.
  • To learn more, visit Doxy's Telehealth Help Page.

Therapy Notes & Other Browser-Based Platforms

Using other browser-based platforms can be trickier since they don’t always support PiP. Here’s what works best:

  • Open two separate windows—one for your telehealth platform and one for Hopscotch Play.
  • Split your screen so both windows are visible. Keep Hopscotch Play larger, and your telehealth window smaller (but still big enough to see your client’s face and reactions).
  • Make sure the Hopscotch Play window/tab is active and in the foreground to maintain the 2-Player connection. Avoid minimizing or moving it to the background.
  • If available, using a second monitor makes this even easier. You can dedicate one screen to your telehealth platform and the other to Hopscotch Play.

Using Browser Split-Screen

If you are running virtual sessions, juggling multiple tabs can be a hassle. Microsoft Edge, Google Chrome, and Firefox now feature built-in split-screen functionality. This tool lets you view two web pages side-by-side in a single tab.

This is a great option for providers who want to have Hopscotch Play open on one side of their screen during a 2-Player session while keeping their telehealth platform visible on the other. It helps you stay productive and prevents you from having to constantly click back and forth between tabs and breaking the 2-Player connection.

Here are the steps to get this set up in your browser.

Microsoft Edge

  1. Open your telehealth platform and Hopscotch Play in the same browser window.
  2. Click the Split screen icon on your toolbar. It is located right next to the address bar.
  3. Your active tab will split in half. Just click on your telehealth tab on the open side to view them together.
  4. Click and drag the middle border to resize the views.

Google Chrome

  1. Open Hopscotch Play and your telehealth platform in the same window.
  2. Right-click on the Hopscotch Play tab at the very top of your browser.
  3. Select the Split screen option from the dropdown menu.
  4. Choose your telehealth tab to fill the other side of the screen.
  5. You can adjust the width by dragging the divider in the middle.

Firefox

  1. Open your telehealth platform and Hopscotch Play in the same window.
  2. Right-click on the tab you want to split.
  3. Choose the split view option from the menu.
  4. Select your second tab to view them side-by-side.
  5. You can easily rearrange or resize the windows by dragging the middle divider.

Using 2-Player with telehealth takes a little setup, but with these tips, you can keep your sessions flowing smoothly while engaging your client in real-time, interactive play.

Quick Answers

Q: How do I use Hopscotch Play alongside my telehealth platform?
A: It depends on the features your telehealth platform supports.

  • If your platform has Picture-in-Picture (PiP):
    Start your session in your telehealth window. Then, open Hopscotch Play in another tab, and click the 2-Player icon to generate a client link. Paste that link in your telehealth chat box. Once you're back in the Hopscotch Play window, prompt your client to click the link — you’ll both see and control the activity in real time.
  • If your platform doesn’t support PiP:
    Open both your telehealth platform and Hopscotch Play in separate windows. Use split screen view to place them side by side, so you can easily interact with both during the session. Send the 2-Player link to your client through the chat and prompt them to click the link and join you in Hopscotch Play.

[#troubleshoot]Troubleshooting[#troubleshoot]

If you’re experiencing issues with Hopscotch Play, such as features not loading correctly or connection problems during a 2-Player session, it may be due to an incomplete app update in your browser. Here’s how to quickly troubleshoot the issue and avoid disruptions during sessions.

Quick Fix: Force a Browser Refresh

Occasionally, you might run into unexpected issues, like slow loading, syncing problems, or features not appearing correctly. These are often caused by an incomplete app update in your browser.

The easiest fix is to refresh your browser, which forces it to load the latest version of Hopscotch Play. You don’t need to do this every time, but it’s a good habit to do every once in a while and especially helpful when things aren’t working as expected.

  1. Log in to Hopscotch Play as the provider.
  2. While on your Provider Dashboard page (before entering any profiles or 2-Player), click your browser’s Refresh button.
  3. Enter your client’s profile and start a 2-Player session.
  4. Have your client click the link to join the 2-Player session. Once they are on the Hopscotch Play screen, ask them to refresh their browser before you begin playing together.
  5. If the client gets disconnected for any reason, they can reconnect using the same original link, as long as you remain in the same 2-Player session.

Refreshing on Safari

Refreshing on Chrome

If you still continue to experience issues, even after a browser refresh, don’t hesitate to contact our support team. Learn more about Contacting Support below!

Quick Answers

Q: Refreshing fixed the issue — do I need to do it every time?
A: No, just refresh occasionally or when something isn’t working.

[#cancelling]Cancelling or Pausing My Subscription[#cancelling]

In This Section You’ll Learn: How to cancel, pause, or delete your Hopscotch Play account. Watch to learn how to cancel or manage your plan or follow the steps list below.


Thank you for giving Hopscotch Play a try! If you are interested in making changes to your subscription status, you can do so by accessing your Account settings located at the top right of your Provider Dashboard.

Next, go to Billing, and then select Cancel Subscription.  When you cancel or pause your subscription, your card on file will be deleted, but you will still be able to access our full library of PDFs, use our 2-player feature, and keep your client profiles in case you choose to upgrade again in the future.  You will be prompted to provide a reason for cancellation and let us know how we could have improved your experience. 

Once complete, your credit card on file will be removed and you will be on the free version of Hopscotch Play.  


To delete your account, you can proceed to Manage Account and select Delete Account which is located at the bottom right of the screen.  Deletion is permanent and you will lose all of your data including client progress.  To complete the process, click on the Delete button.  You are always welcome to create a new account if you are ever interested in returning in the future.

If you experience any issues, please do not hesitate to contact us through the Help button on your dashboard or email us directly at support@joinhopscotch.com.

Steps to cancelling or pausing your subscription

  1. Go to Account Settings > Billing.
  2. Click “Cancel Subscription.”
  3. You’ll retain access to PDFs and saved profiles in free mode.

Steps to delete your account

  1. Go to Account Settings > Manage Account.
  2. Click “Delete Account.”
  3. This action is permanent and removes all data.

Quick Answers

Q: What happens when I cancel?
A: You’ll move to the free plan and still have access to many features.

Q: Can I come back later?
A: Yes. You can reactivate anytime by subscribing again.

[#find-help]Where to Find Help[#find-help]

In This Section You’ll Learn: How to find tutorials, use the support chatbot, submit support tickets, and schedule a live support call when you need additional help.

On Hopscotch Play, help is always just a click away. Throughout the platform, you’ll see small question marks next to specific tools and features. Clicking these will pull up a short video tutorial to show you exactly how that feature works. If you’re looking for our full library of help videos, just head to your provider dashboard or within any client profile and look for the Tutorials icon at the top. This is where you’ll find videos about account management and using certain features and tools.

If you need immediate assistance, our support chatbot is always ready in the bottom right corner of every page. Just click the icon to expand it. At the top of the chat window, there’s a dropdown menu with common topics that link directly to our external help page. We recommend checking these out first, as they’re packed with answers that can often solve a problem quickly.

You can also type a question directly to the chatbot for a quick response. If the answer isn’t quite what you need, just click No when asked if it was helpful. You’ll have a chance to clarify your question, and if you’re still stuck, clicking No again will escalate the issue to our team. From there, you can submit a support ticket, which sends us a copy of your chat history so we can get up to speed quickly. We highly recommend attaching a screenshot to your ticket, as it is incredibly helpful when we’re troubleshooting a specific issue for you.

After clicking No twice in the chatbot, you’ll also have the option to schedule a quick 15-minute call with our support team. It’s a great way for us to see what’s happening live and diagnose the problem together. Just remember to be ready to share your screen when you hop on so we can see exactly what you’re seeing. We’re here to make sure the platform works perfectly for you, so you can stay focused on the kids you serve.

Steps to Finding Help

  • Click the question mark icons throughout the platform to watch short feature tutorials.
  • Open the Tutorials section at the top of your Provider Dashboard or inside a client profile to browse all help videos.
  • Use the support chatbot in the bottom-right corner of any page for quick answers.
  • Browse the chatbot’s dropdown menu for links to common help topics and guides.
  • If the chatbot answer isn’t helpful, click No to clarify your question or escalate the issue.
  • Submit a support ticket to send your chat history and issue details to our team.
  • Schedule a 15-minute support call if you need live troubleshooting help.

Quick Answers

Q: Where can I find tutorials or help videos?
A: Click the Tutorials icon at the top of your Provider Dashboard or inside a client profile to access help videos and walkthroughs.

Q: What do the question mark icons do?
A: Clicking a question mark opens a short video tutorial explaining that specific feature or tool.

Q: Where is the support chatbot?
A: The support chatbot is located in the bottom-right corner of every page.

Q: Can I ask the chatbot questions directly?
A: Yes. Type your question into the chatbot for quick help and troubleshooting.

Q: How do I submit a support ticket?
A: If the chatbot answer isn’t helpful, click No twice and you’ll be given the option to submit a support ticket.

Q: Can I schedule a live support call?
A: Yes. After clicking No twice in the chatbot, you’ll also have the option to book a 15-minute support call with our team.

[#faq]Frequently Asked Questions (FAQs)[#faq]

Getting Started and Access

Q: What device settings are recommended for the best experience on Hopscotch Play?

A: Currently, Hopscotch Play is best experienced on a laptop, desktop, or tablet. Hopscotch Play does NOT currently support phones.  See below for recommended device specs for a smooth experience. For the best experience with Hopscotch Play, we recommend:

  • An internet speed of 100 Mbps or higher for smooth streaming and gameplay
  • A laptop, desktop, or tablet (NOT supported on phones)
  • At least 8GB of memory and a recent processor (like Intel i5 or AMD Ryzen 5)
  • Windows or Mac operating system
  • Using Chrome, Safari, or Edge browsers

Q: What age group is the Hopscotch Play platform designed for?

A: Hopscotch Play can be used with children aged 5 to 18 years old, its appropriateness for specific age groups can be determined by the therapist based on the developmental stages and individual needs of the child in therapy. We are always working to expand our content library.

Q: How can I access the content on the platform?

A: Once you sign up to Hopscotch Play, you can access the content via our website on any computer or tablet with internet access. No need to download anything – it's all easily accessible online.

Q: Is Hopscotch Play available internationally? 

A: Yes, Hopscotch Play is accessible in the following countries: 

  • United States
  • Australia
  • Canada
  • India
  • New Zealand
  • Republic of Ireland
  • South Africa
  • United Kingdom

Q: Is there a free trial available before subscribing?

 A: Yes, we offer a 14-day free trial period so you can explore the features and content of Hopscotch Play before committing to a paid subscription.

Q: What is the cost of a subscription to Hopscotch Play, and are there different pricing plans available for groups?

A: The cost of a subscription to Hopscotch Play is $19.99 per user, per month. We offer different pricing plans for individual and group users. You can find detailed group pricing above. Additionally, we provide a free trial period for you to explore the app's features before committing to a subscription. Sign up here!

Q: How do I submit a purchase order for Hopscotch Play?

To submit a purchase order, please follow these steps:

  1. Request a quote: Email us at support@joinhopscotch.com with the number of seats you'd like and the billing contact information. We'll send back a formal quote.
  2. Send us your PO: Once your organization generates a purchase order, email a copy to support@joinhopscotch.com.
  3. As soon as we receive the PO, we’ll process it, and you’ll receive an invoice for payment based on your PO terms.

If your school or organization requires a W-9 or vendor paperwork, let us know and we’ll be happy to provide it!

Content and Features

Q: What type of content is available on the Hopscotch Play platform?

A: Hopscotch Play offers a diverse range of content to enrich therapy sessions. This includes interactive games and activities, therapeutic stories, printable materials, educational videos, and audio content.

Q: How frequently is new content added to the platform?

A: We regularly update Hopscotch Play with fresh and engaging content. New games, activities, stories, and printables are added to ensure a diverse and continually enriching experience for users.

Q: Is there a specific curriculum or therapeutic approach followed on the platform?

A: Hopscotch Play is designed to complement various therapeutic approaches. While it doesn't adhere to a specific curriculum, the content is developed with input from child therapists to support a broad range of therapeutic strategies.

Q: How can I use Hopscotch Play for virtual therapy sessions?

A: Our unique 2-Player feature lets you generate and share a link, allowing your client to join you on the Hopscotch Play platform. With just one click, they can participate in games, read stories, watch videos, and explore content alongside you.

Privacy, Support, and Feedback

Q: Is Hopscotch Play HIPAA compliant?

A: We take the privacy and security of user data seriously. Hopscotch Play adheres to strict data protection measures, and all user information is handled in accordance with industry standards and regulations.

Q: How do I cancel my subscription if needed?

A: Canceling your subscription is simple, and there are no hidden fees. You can cancel your subscription and delete your account through the account settings on the platform.

Q: Can I provide feedback or suggest new features for the platform?

A: Absolutely! We value user feedback. You can share your thoughts, suggestions, and feature requests through our contact form on the website or directly on the platform itself. Your input helps us continually improve Hopscotch Play.

No items found.